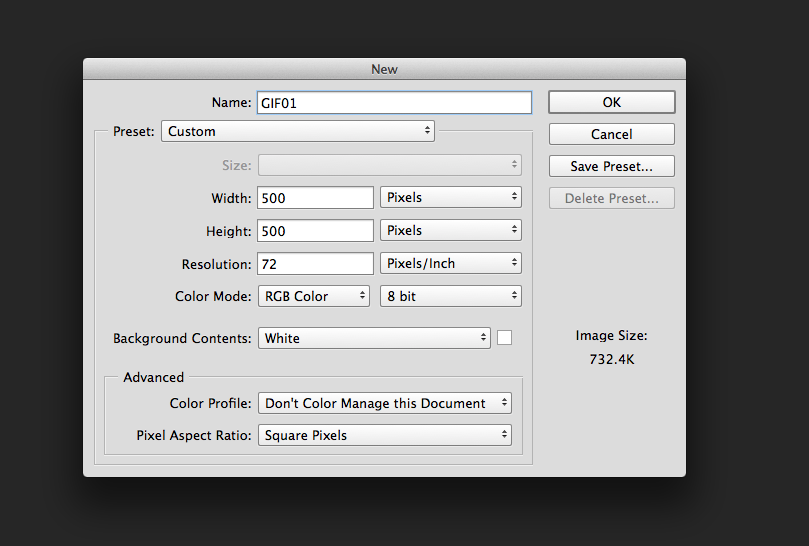
- First set up a new page with the correct dimensions 500x500 pixels, format RGB, 72 Pixels/Inch
- Then set the document to Motion in the top right hand corner, select the Create Frame Animation and a new timeline will appear at the bottom of the page. Each frame that is then added will contain the movements that are added to each image.


- Then I started to add the different images I had sketched and painted using watercolour paints.
- Using these images I build up the layers I was going to use to create the GIF
- Each layer represented each individual movement in the final gif
- Each time I animated a element I had to make sure it was on the correct timeline frame or this would throw out every element I had done on every frame.
- Naming each layer with what was in it helped with keeping track of what parts where what.
- I added a static background of a real image i took from google images of a galaxy, a bed of daisies. I did this as i liked the look and contrast between my hand drawn images and the well taken photos, if i was to do it again i would try use some photos I have taken instead of thieving them from google.
- Scanned in Every drawing I was going to use and the different parts of the characters I wanted to animate. Making sure they where all scanned in at the same resolution 300 dpi.
- These are all the layers used to create my Pineapple Wizard GIF, 24 layers.


 |
| When all the layers are visible it looks a bit like caos. You can see every stage of the gif in this one screen shot that makes no sense. |
 |
| The 3 different stages of dust when the PIneapple wizard hits the ground |
 |
| A selection of arms i could of used. |
 |
| I tried a few different options for clothing but settled n s basic t shirt, keep it simple. |
 |
| The two hooks i could choose from to use. |
 |
| The different frames and the difference in times I used to create the final GIF. I played around with these for some time as I could control how the final gif would appear |
Whilst placing the layers on each frame I had to move the image around until i got the placement correct, this was very important to get right as if it was out even a tiny bit it showed up when the GIF was run as a little glitch or movement on the screen and was very noticeable. Using the arrow keys on the keyboard i was able to move the frame the smallest amount to get it in the correct place.
Then to make the layers animated I again used the arrow keys and shift key to help me create the movements, by doing this i was able to keep a log of the amount of times the layer had moved and this helped when i did the next layer as i knew how many clicks the movement was going to need to make it look fluid and a clean movement.


- Saving the final GIF so it would be able to be emailed and then added to my blogs
- Using the save for web tab this brings up 4 screen page and you can sort out the colour amount as by dropping this lowers the amount of space needed for saving and increasing increases the file size.
I am very happy with my final GIFs as the work and the visual results are good, I would just like to do this all again but spend more time on the beginning stages, planning the gifs and get the drawings of the characters spot on and as i feel this would give a more professional looking result. On the slug gif i would draw the frames in between the ones if already got to see if that made its movement smother. Also i did not notice the side of the gif when it gets to the start of the loop you can see all the frames eyes for a split second, I only noticed this when it was shown on the projector.
I would do the same on the Pineapple wizard one, just adde more frames an drawings to try smooth the movement. The runny nose would just have text added declaring the start of hay fever season.
No comments:
Post a Comment