Monday 26 January 2015

Evaluation OUIL405


Leeds College of Art
BA (Hons) ILLUSTRATION
Level
04
OUIL405 Visual Narratives
Credits
20
End of Module Self Evaluation

NAME
Sam Metcalf


1.  Which practical skills and methodologies have you developed within this module and how effectively do you think you are employing them within your own practice?

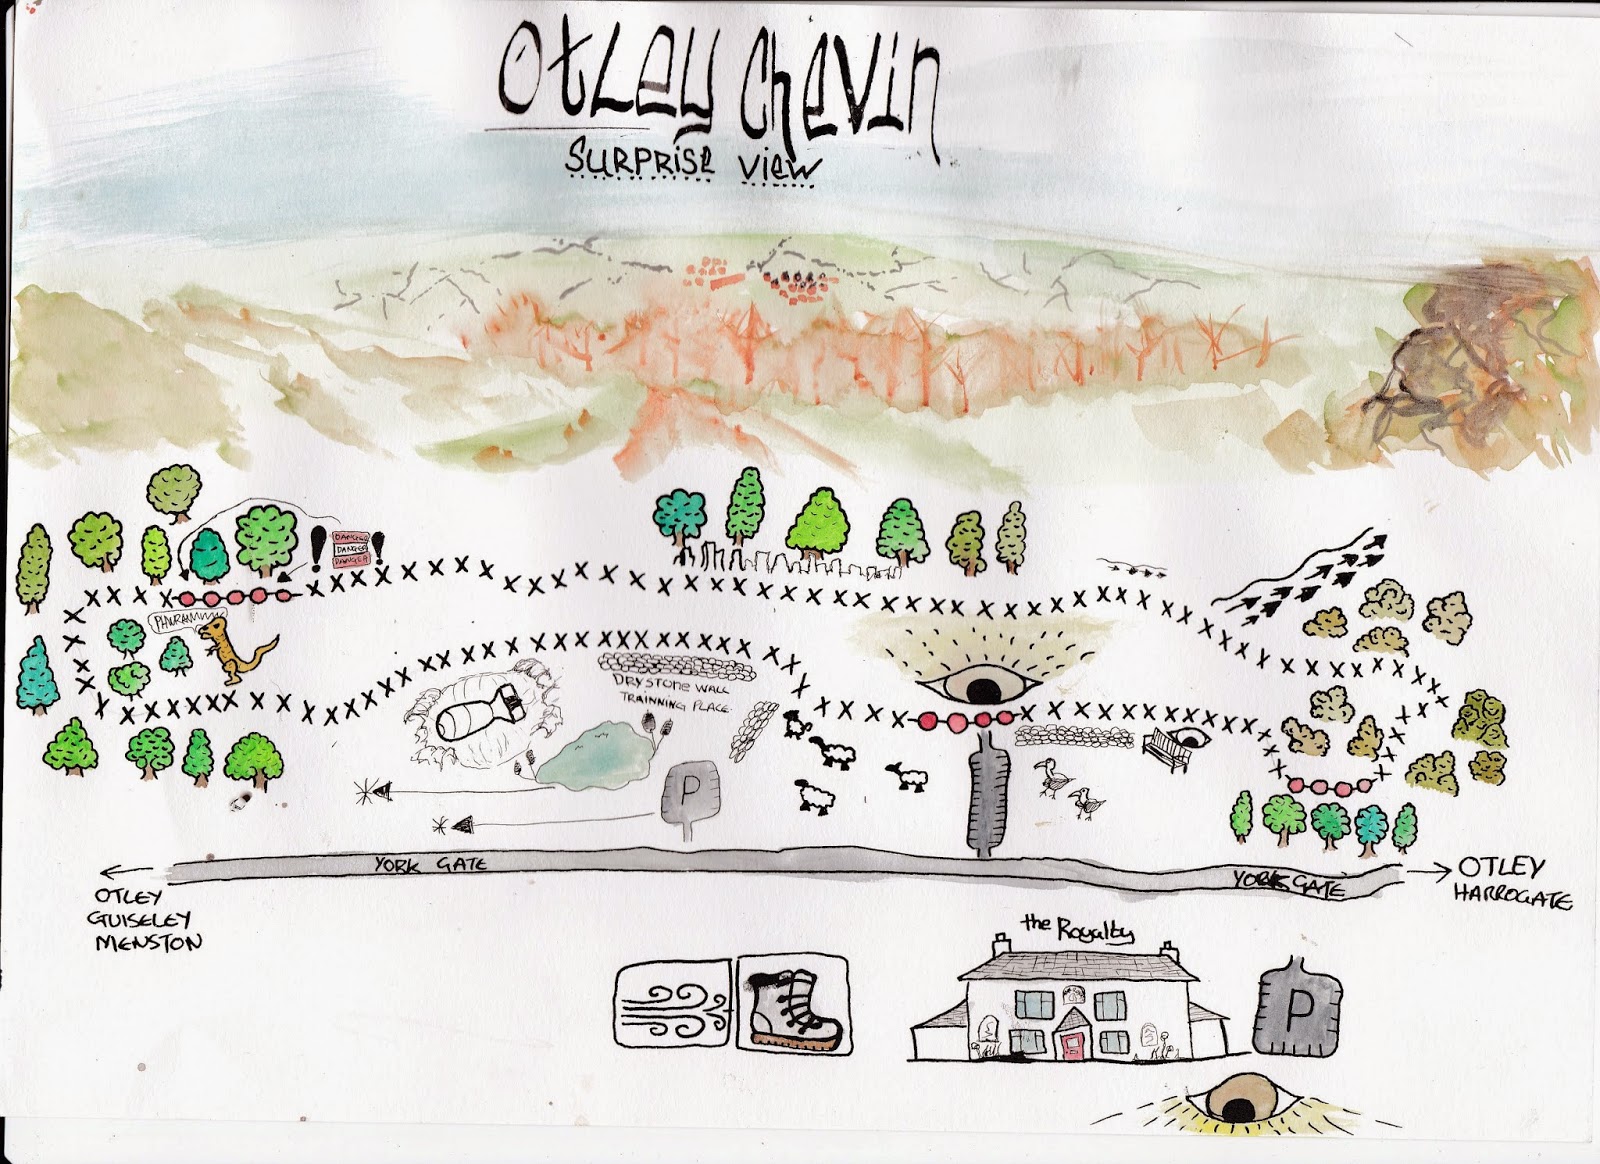
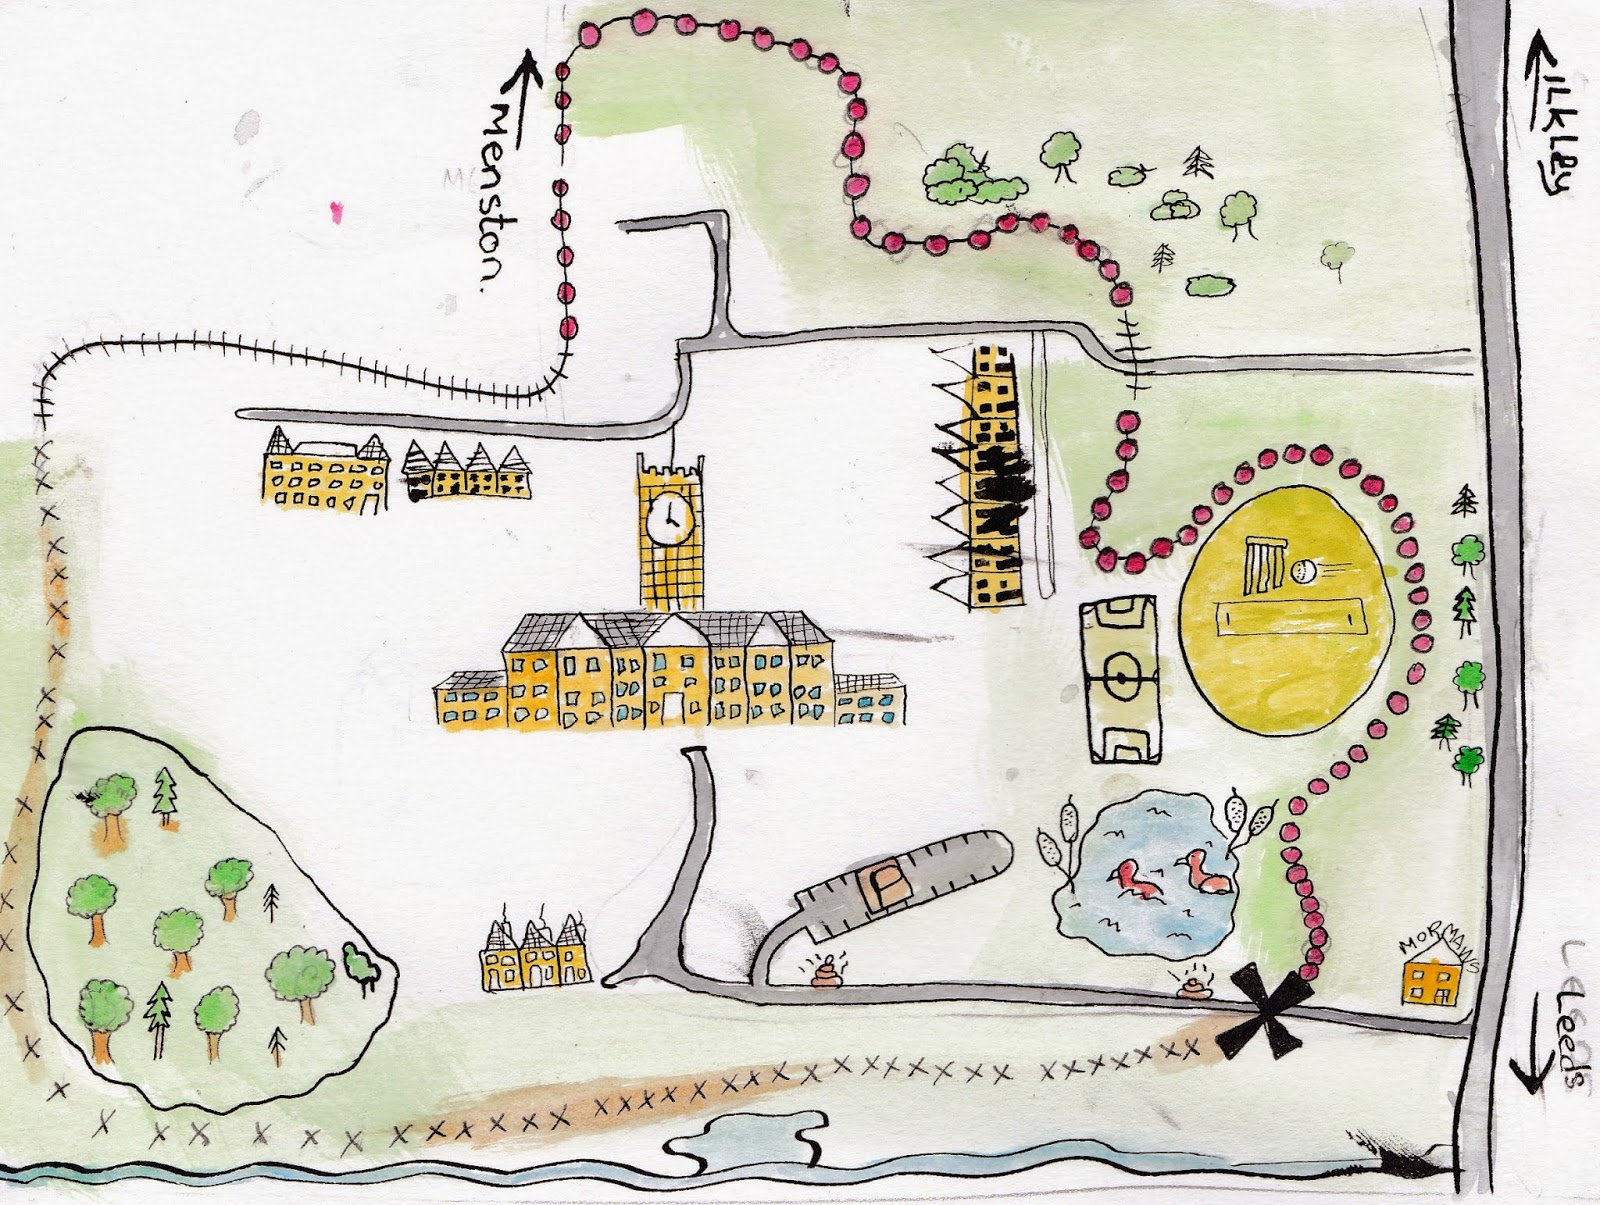
On this module I have worked in ways I have never done before to try and achieve different results. First I decided that I wanted to do all the drawings with only dip pens and inks for the line work coloured in with watercolour paint and completely take on the pencil stage. I did this as I feel I get lost using pencil trying to make perfect marks and lines. Using the dip pen and ink made me develop my ideas one after the other, this in turn made my confidence grow from drawing to drawing and doing a few drawings of each image gave me plenty of practise.
Also I have used computer programs for the first time to aide me in my design proses. Using Photoshop and my scanner I have learnt how to get my images to the computer and by using the different elements in Photoshop make my images look and feel more professional with a few slite alterations, and how using multiple layers can help to build up a design and be able to manage it all the way to the processes.
Then I used Indesign to set out how my book was going to look when printed. I only used this software at the very end of this project and feel I only skimmed the surface to what that program can do. So again I will be looking at what else this program can do as I feel it could aid me in other ways to produces work in book and zine layouts.

2. Which approaches to research have you found most valuable during this module. How have you interrogated your research to identify appropriate ideas?

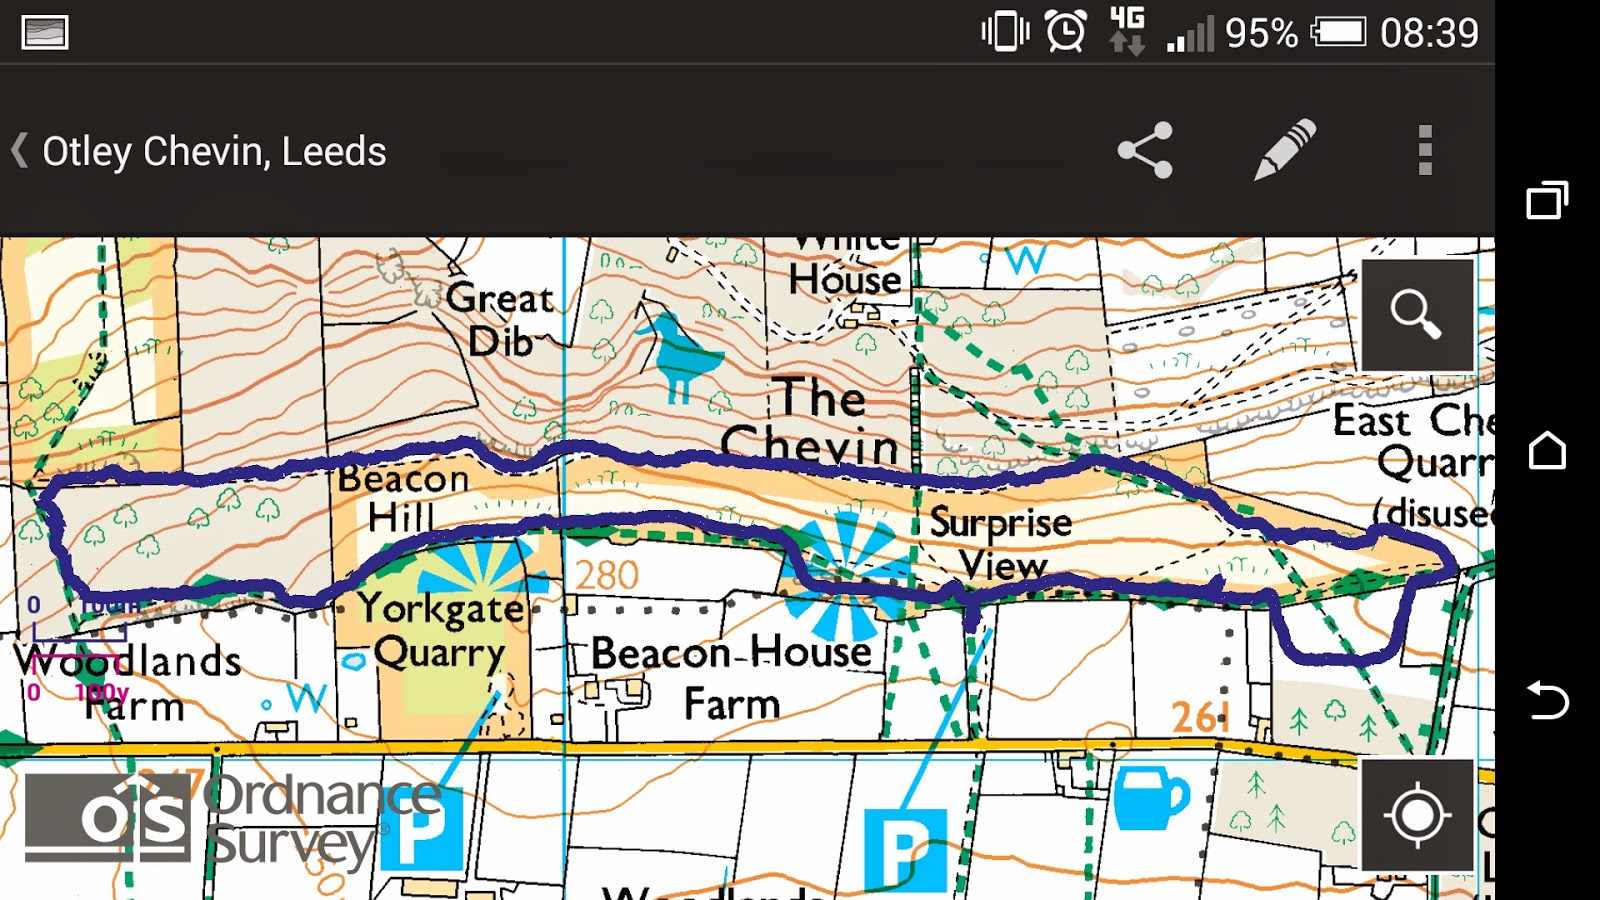
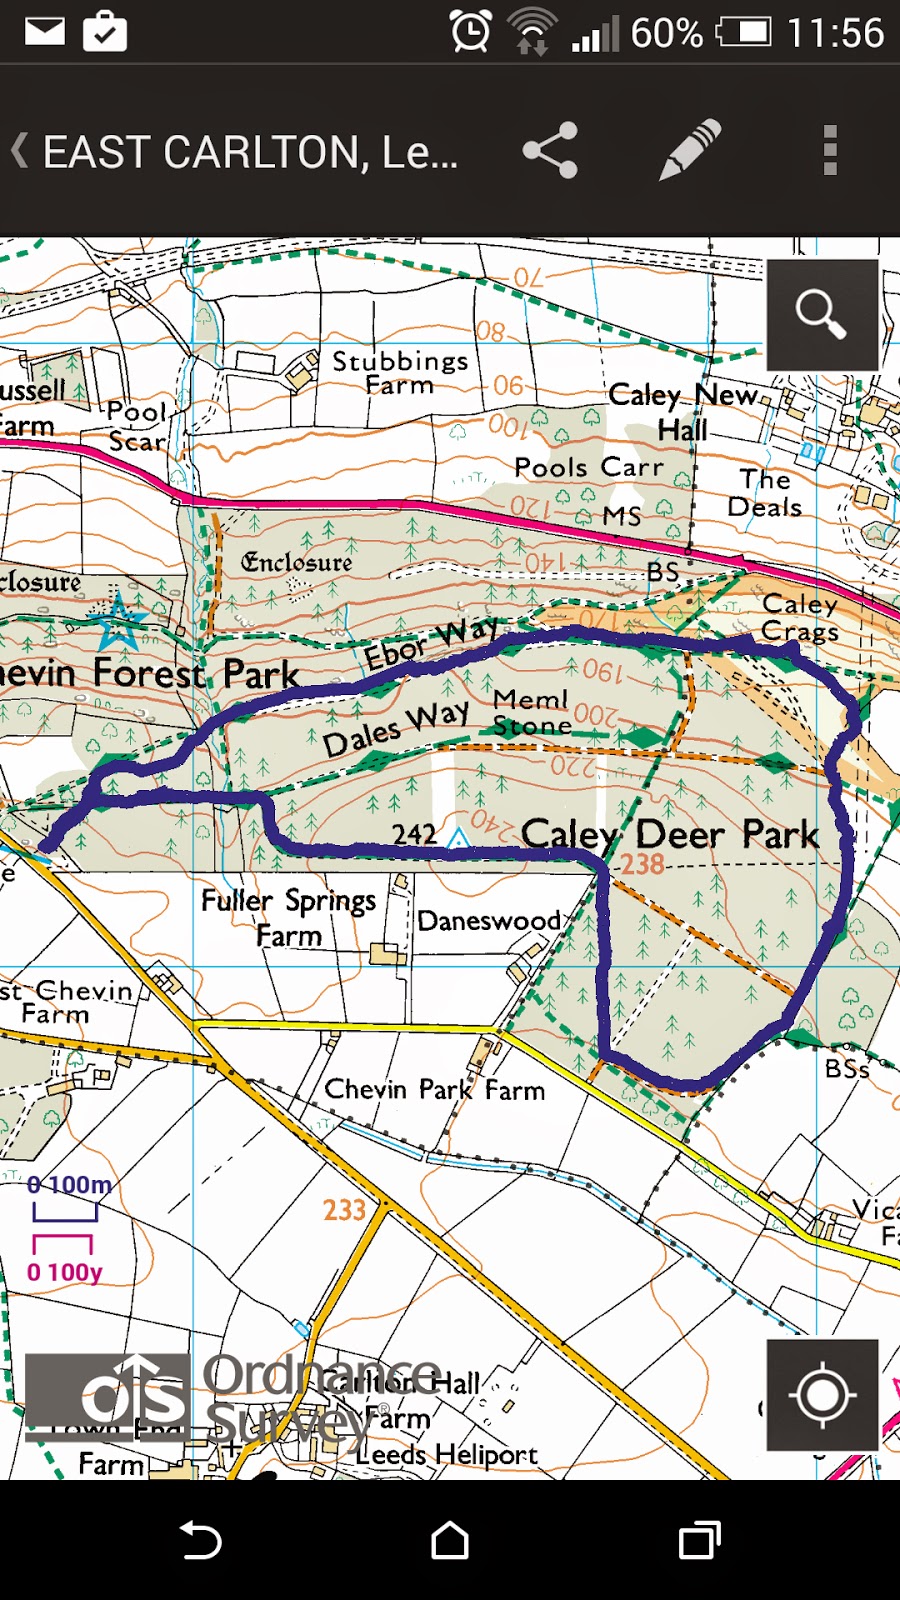
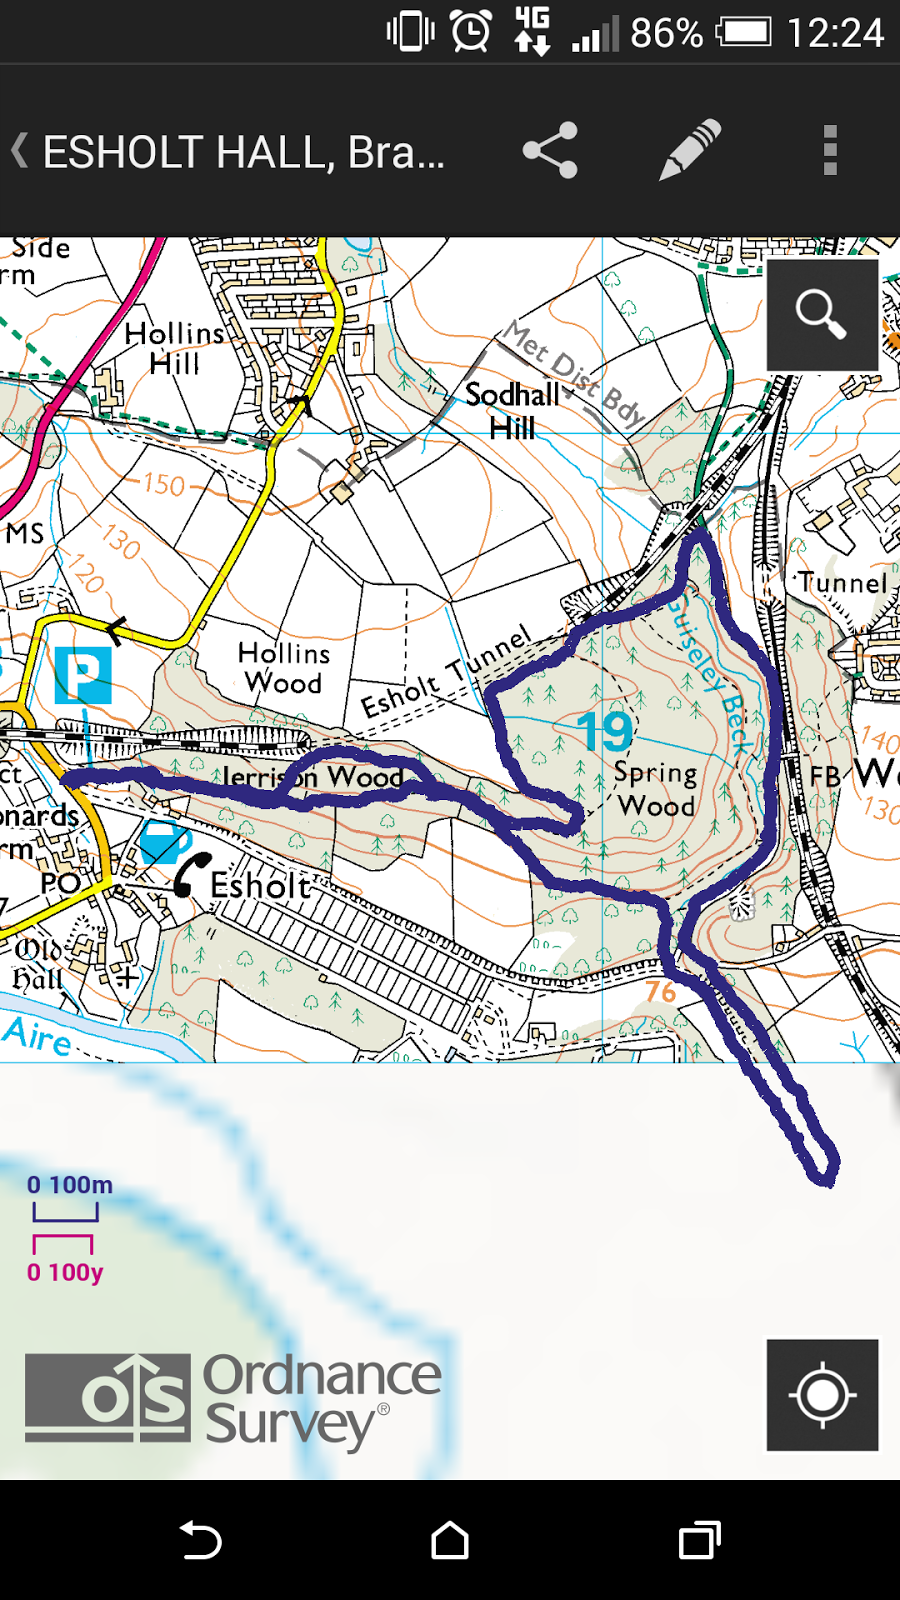
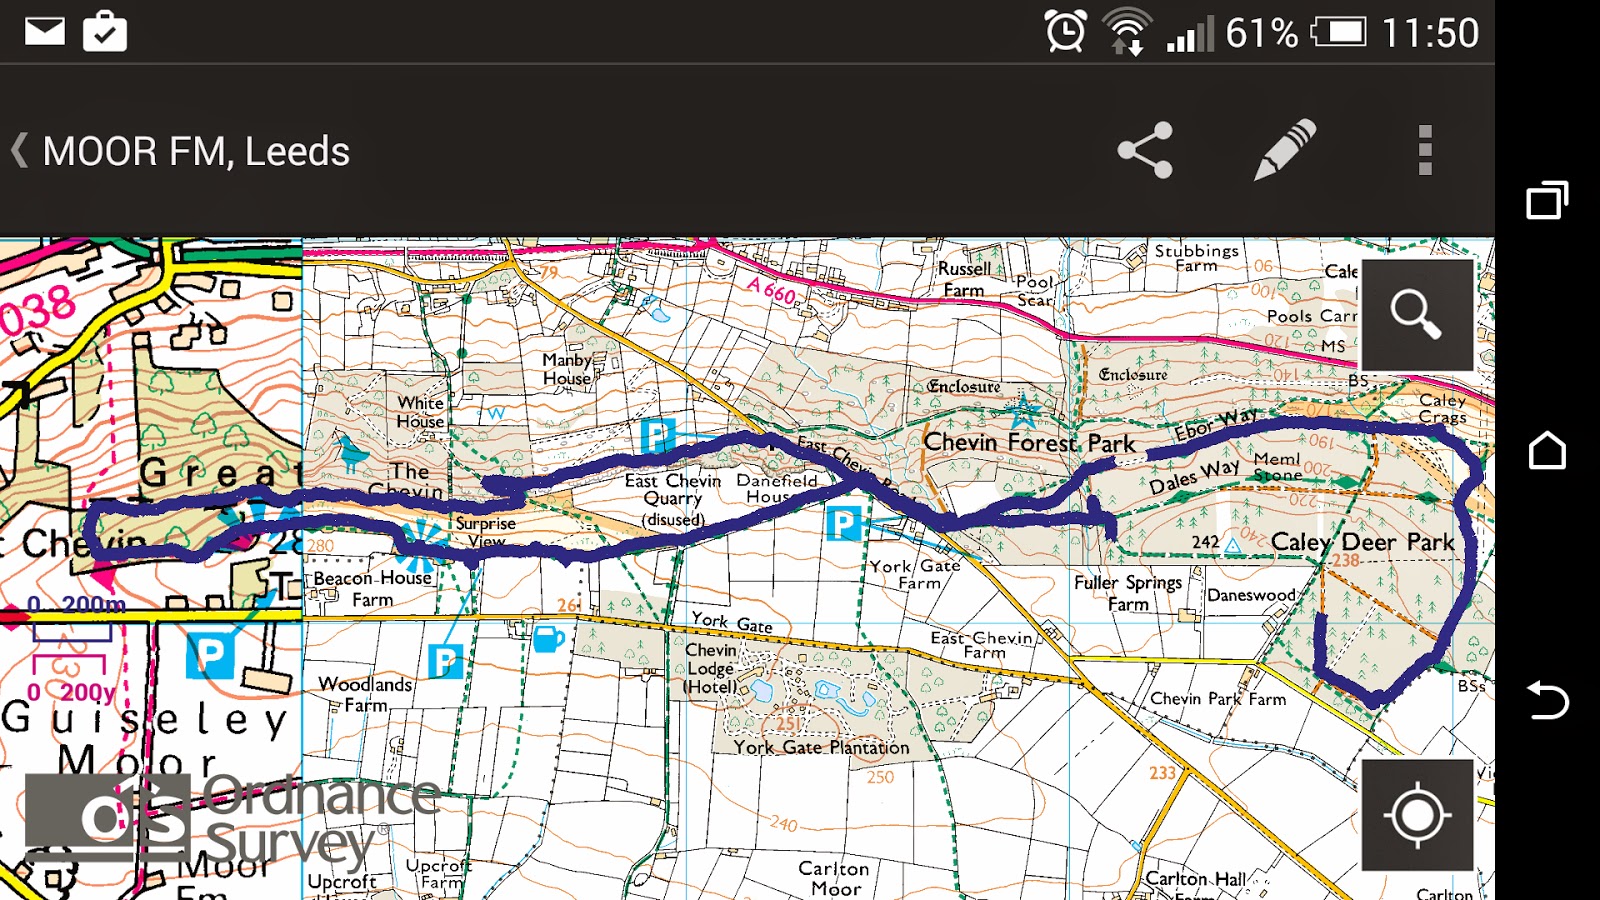
I found that by going to the location multiple times got me very familiar with the routes and surrounding areas, even though I have been to these places all my life the times I went for this project made me look harder and see things I have never notice or seen before. As I wanted to design guild style maps for these places I ended up using the Ordnance Survey app and maps to research and recorded the routes and this in turn showed me I had to develop a key that could be easily translate and be used by others. Using the maps was great as I really enjoy looking at maps and never have used the OS ones before, this in turn helped me plan my routes very accurately and find new routes I could take to make mine more interesting. 


3. What strengths can you identify within your submission and how have you capitalised on these?

I did my project on walking and this is something I do a lot of and really enjoy doing it so this made the whole project enjoyable to me. This had a massive knock on effect on what I was trying to produce and drove me to try and do lots of work in a small amount of time. I know that ever project I do will not be on something I enjoy but I feel that this gives me a big helping hand and drive to produces a good standard of work.


4. What areas for further development can you identify within your submission and how will you address these in the future?

I feel my time management let me down massively on this project as I did not make a plan and targets to be done. If I had done this I would not of been rushing around like I was at the end and this resulted in me running out of time and not been able to put the text in the book.

Changing my ideas half way through the project did not help me either and feel that this took loads of the time but if I hadn’t of started where I had I don’t think u would of lead to the point I got to. Because I did it on personal places of interest this then gave me the idea of sharing them with everyone else and try creating maps for the places I waned to. 

5. How effectively are you making decisions about the development of your work?
What informs these decisions? What problems have you identified and how have you solved them?

I found that just through trail and error and in the development I was learning a great deal about the processes I had set myself to learn. By seeing what I had done before and seeing what other methods I could try next helped me understand which processes would be worth using again to improve my work. With Photoshop I found if I talked to my peers I could find out ways that I could do secretin things which would help me better use the program, the one I found really handy even though its not a major element was using the brackets ([,]) for increasing and decreasing the size of the brush and rubber tools.
Also by using Google search and Pintrest to look at other people’s hand drawn maps I could see what they had included to they designs to make them a success, also seeing if I had added too much and made the maps over bearing with information that they are no good to use.


6. How effectively have you managed this project and organised yourself during this module?

I feel I managed my time very badly and spoiled my end product by not giving myself enough time at the end of the project to perfect and tweak my idea and deliverer it to a higher standard, at the end I was in such a rush I did not save my work correctly which resulted in my front cover been ruined because of the quality it got printed in and no text was added. I know now that I need to make a plan when trying to tackle a project so big and work out which bits need more time spending on them then others.


7.How would you grade yourself on the following areas:
(please indicate using an ‘x’) 

5= excellent, 4 = very good, 3 = good, 2 = average, 1 = poor

1
2
3
4
5
Attendance


tick

Punctuality


ick
Motivation


tick

Commitment


tick

Quantity of work produced


tick

Quality of work produced


tick


Contribution to the group


tick


The evaluation of your work is an important part of the assessment criteria and represents a percentage of the overall grade. It is essential that you give yourself enough time to complete your written evaluation fully and with appropriate depth and level of self-reflection. If you have any questions relating to the self-evaluation process speak to a member of staff as soon as possible.


·       A printed copy of this evaluation should be submitted with your work.
·       A copy of your end of module self evaluation should be posted to your studio practice blog. This should be the last post before the submission of work for this module and will provide the starting point for the assessment process.
·       You should also post a copy of your evaluation to your PPP blog as evidence of your own on going evaluation.

Notes / Comments for the Module Leader


Signature
Sam Metcalf
Date:26/1/2015


Sunday 25 January 2015

Photoshopping (Scanning In and altering)

So I have had to do a lot of drawing, scanning and learning how photoshop can help improve the final outcome of a illustration. Whilst i was making up my maps and adding the different drawings for each section I became aware that i had been doing all my drawings very small so they fit on the map, but in fact even tho I loved the process of drawing things very small as i dont normally do that, I found I did not need to do that and could just draw them normal size and change the size in photoshop. This was good to find out because when you draw at a normal size and change the size in photoshop it seems to hold  a lot of the detail that had been added, i assumed that if i had done this i would of lost a lot of the detail and the images would of become distorted and looked like blobs and blurs.


One of the trees at full size

here is the same tree with its self shrunk down, but to the naked eye it looks the same and losses very little detail, its only if you zoom in then it is a little distorted


But when drawing small it  does save you a lot of time if you're working to a deadline and need to get it done, but if you have the time i feel it could be a better result for your final illustration to spend the time doing it bigger and altering the size digitally for a cleaner end result. 


Building the Maps on Photoshop (New Skill Acquired)

So i have been working out how to use photoshop by just sitting and playing around with the program as well as watching a few tutorials on Youtube. So i decided to draw all the elements i needed to make my maps then scan them in and use Photoshop to do the final stages of the design.


  • Using my Ordnance Survey map I had screen shot as a base layer 

  • Then i used the Magic Wand tool and selected the route and cut it from the image. 


  • I used all a new layer for each element I was to put on the map so I could then go back and do any changes i need to easily by selecting the layer i needed. By naming each layer I was using with the object it had in it this made it even easier to stay in control and know where everything was in the list. 
  • So  pasting the route to its own layer and using this as a base layer as it would be a good reference for placing the rest of the images to their correct positions 


  • You can see on these screenshots the main points of interest that were added to my map. I kept the Ordnance Survey layer hidden and when I needed it made it visible so i could see where the streams and railway tracks needed to be added.  


  • Then adding the trees at the end felt like they filled in the black space and pulled most of the images together and made it feel a little more like a map full of images and made it more interesting. 
  • Once the trees were added I was very happy with how it was looking but the blank background needed something to make the whole design more interesting as it made feel boring. So i painted a few different textures onto paper to try and give it a muddy look as the wood are always muddy. After scanning it in I change them slightly using the Levels tab in the Adjustments to get a better contract and give better tonal qualities to the texture. 


  • Once this was done the only thing left to do was take what i had done and apply it to the rst of the maps i wanted to include in the book. 
Im very happy I have finally learnt how to use photoshop and i'm very sure this is going to be a good skill to have learnt, but i know i still have a lot to learn in the program and need to continue to use it to further better my skills.

Tuesday 13 January 2015

MAp Development, the routes.

These are the first drafts/test maps i have done im happy with the outcome so far and i feel the key chart could be a good way of illustrating what is in and around theses routes. Next step make it look visually better i'm going to try 3D these maps next and make them a lot more interesting. 

I used the ordinate survey map app to track my routes. These are just screen shots of the maps as they save them in a file format that a computer does not understand, but the screen shots give a spot on route taken. 


The Chevin (surprise view) 3miles 1hour

From the map I have have been able to translate the route to paper very easily.
I have try adding all the necessary information I have gathered and using the key added to the map, but i feel it still needs something to make theses maps a lot more interesting, I also need to be careful that I don't over do the information on the maps as this could start to get a lot more confusing then helpful.  

First attempted at putting all the information together for The Chevin 

Quick one for High Royds to see how the paths and key images need to work 


Carlton Woods 3miles 1hour15mins
Esholt Woods 3.5miles, 1hour30mins

The Big One
Chevin (surise view) and Carlton Woods
7miles, 2.5 hours

In the end I decided to save on paper, pens and time and to just try and trace over the routes using Photoshop and this turned out to be a great idea. Not only did it save me time it made me realise that photoshop is not as hard to use as I have alway thought it was.  So i used the pencil tool on a new layer to trace the line and this was then ready for me to build my design up from. After doing the first one this way I tried the same with the second and  realized I could just use the magic wand tool to just select the route only and copy and paste it to a new layer to begin the rest of the map. 

Saturday 10 January 2015

Map Development, Key Chart imagery

After starting my idea of looking at try to illustrate a guild/map for the areas I go walking i realised i needed to create tiny little images that could used on the different maps. I needed to to create a key that could be used throughout the book on all the maps and have the same images so it was easy to use and not confusing with all different images, I feel if the maps where just full of all sorts of different images for the same things it would be more like a puzzle then a helpful guild.
So heres what i have created so far and i intend to keep on developing these and adding more to build up a tiny illustrated world.


First time trying a key chart realised i needed a whole bank of images to help illustrate a guild.
Different styles of


trees.


The little bits of visual information that can be found round the walks, these I feel could be used as great sign points for people to look out for so they know they are on the right tracks of the walk.


Working out different styles of residence.


A dog walkers guide to walkies

So due to a breakdown in research on my original book i am starting a new fresh idea, but i'm still using  some of the research i have gathered from the places i have been, nothing goes to waste eco friendly. As i am a proud dog owner (overly obsessed)  I take my dog with me on most trips out of my house. When the three of us (third person is my owner the Hannah-tron)  go out to discover new places for walkies its sometimes hard to know if the place is dog friendly and what the conditions are like there. So my idea is to come up with a guild to show other people what the places we go waking are like and what they can except. I want to come up with a series of hand drawn maps with all the information and what you need to be prepared for when visiting theses areas. these are shortish walks nothing too big as i feel when they get bigger that's classed as hiking and we are not at that stage yet.

To begin with I have looked at other maps that other illustrators have done and tried to get some inspiration for how i want my maps to look.
Meshon

http://www.theaoi.com/awards/winner-details.php?id=87

Aaron Meshon from Brooklyn made a map of the place he lives and all the things in and around it. Using Pen and ink and then scanned it in to photoshop to fill with colour.


Wranwright has been walking and drawing the lake district since he first went there at 23. He does very detailed drawings of the areas and also adds a map of the area so you can walk it and enjoy the views.
 http://www.wainwright.org.uk

After looking at a lot of maps its easy to say i am wanting to create a guide to the places I go not just maps. As with a guild you get a map but you also have a key that goes aload side the map with all the useful information you should need. Looking at maps has given me some good insight into the different maps that are available on the market and the different types ie waterproof and non waterproof !

Ordnance Survey logo I have downloaded the Ordnance Survey app to track my walks to the meter to get good information, this also tracks where i have walked very acutely and gives a very good map of the route, which i can then use to plan my own interpretation of my map.
Unfortunately these maps are saved in a format (gpx) that my mac does not recognize so i need to find a way i can download them and print them off.

Saturday 3 January 2015

Mutation of me

Slash and I

I went to my friends 40th birthday party and the theme was a famous person with the same first letter starting name. So i went as the legend SLASH as hes just an amazing musician and im a fan of his music. 

Here i am dressed up as him and on the right im with my god Hermes thats how Slash rolls he dates gods not humans. 

\\


Here i have  drawn the portrait of the image above in pencil, I h ave never done a "self" portrait before and i found it very difficult. I feel I need more practice at drawing portraits to better understand how to draw the dimensions of the face getting the spaces between the different features right and spaced equally.